![[Message Queue - 2부] AWS - SQS (Simple Queue Service) 알아보기](https://cdn.hashnode.com/res/hashnode/image/upload/v1710076525654/2a9117d6-c8ad-431c-a02b-f98e59771f4c.png?w=1600&h=840&fit=crop&crop=entropy&auto=compress,format&format=webp)


🎯 Research Objective
AWS SQS Setting + Nestjs Setting
AWS SQS를 통해 메세지 큐에 Message를 등록할 수 있다.
AWS SQS를 통해 메세지 큐에서 Message를 읽을 수 있다.
AWS SQS에서 Job이 성공했을때 성공처리 방법.
AWS SQS에서 Job이 실패했을때 메세지 보존 방법.
📌 What is AWS SQS ?
개념
AWS에서 운영하는 메세지 큐 서비스로 소프트웨어 간 메세지를 Produce OR Consuming 할 수 있는 시스템이다.
AWS SQS는 기본적으로 장애에 대하여 상당히 높은 안정성을 가진다.
즉, 메세지 브로커 서비스로 메세지 버퍼 역할을 수행함.
AWS SQS 구성
Producer
- 메시지 발행
SendMessage
- 메시지 발행
Consumer
메세지 수신
ReceiveMessage메세지 완료 처리(삭제)
DeleteMessage메세지 실패처리
ChangeMessageVisibility
More Details for Message
메세지는 용량은 0KB ~ 256KB.
메세지는 0일 ~ 14일 간 유지 가능.
AWS SQS 표준 : FIFO
AWS SQS를 생성 시, 표준 또는 FIFO 방식의 대기열을 선택할 수 있다.
표준 (At least once) :
최소 1회 이상 전송을 보증하나, 중복이 발생할 수 있으나 유실될 수 없음.
처리량 : 거의 무한대에 가까운 메세지
FIFO (Exactly once) :
정확히 1회의 전송을 약속, 중복 여부 체크 후 SQS에서 중복 메세지 버림 처리.
초당 최대 300건 내외 (한번에 최대 10건 처리 가능하므로, 3000 Message/Per Second 처리)

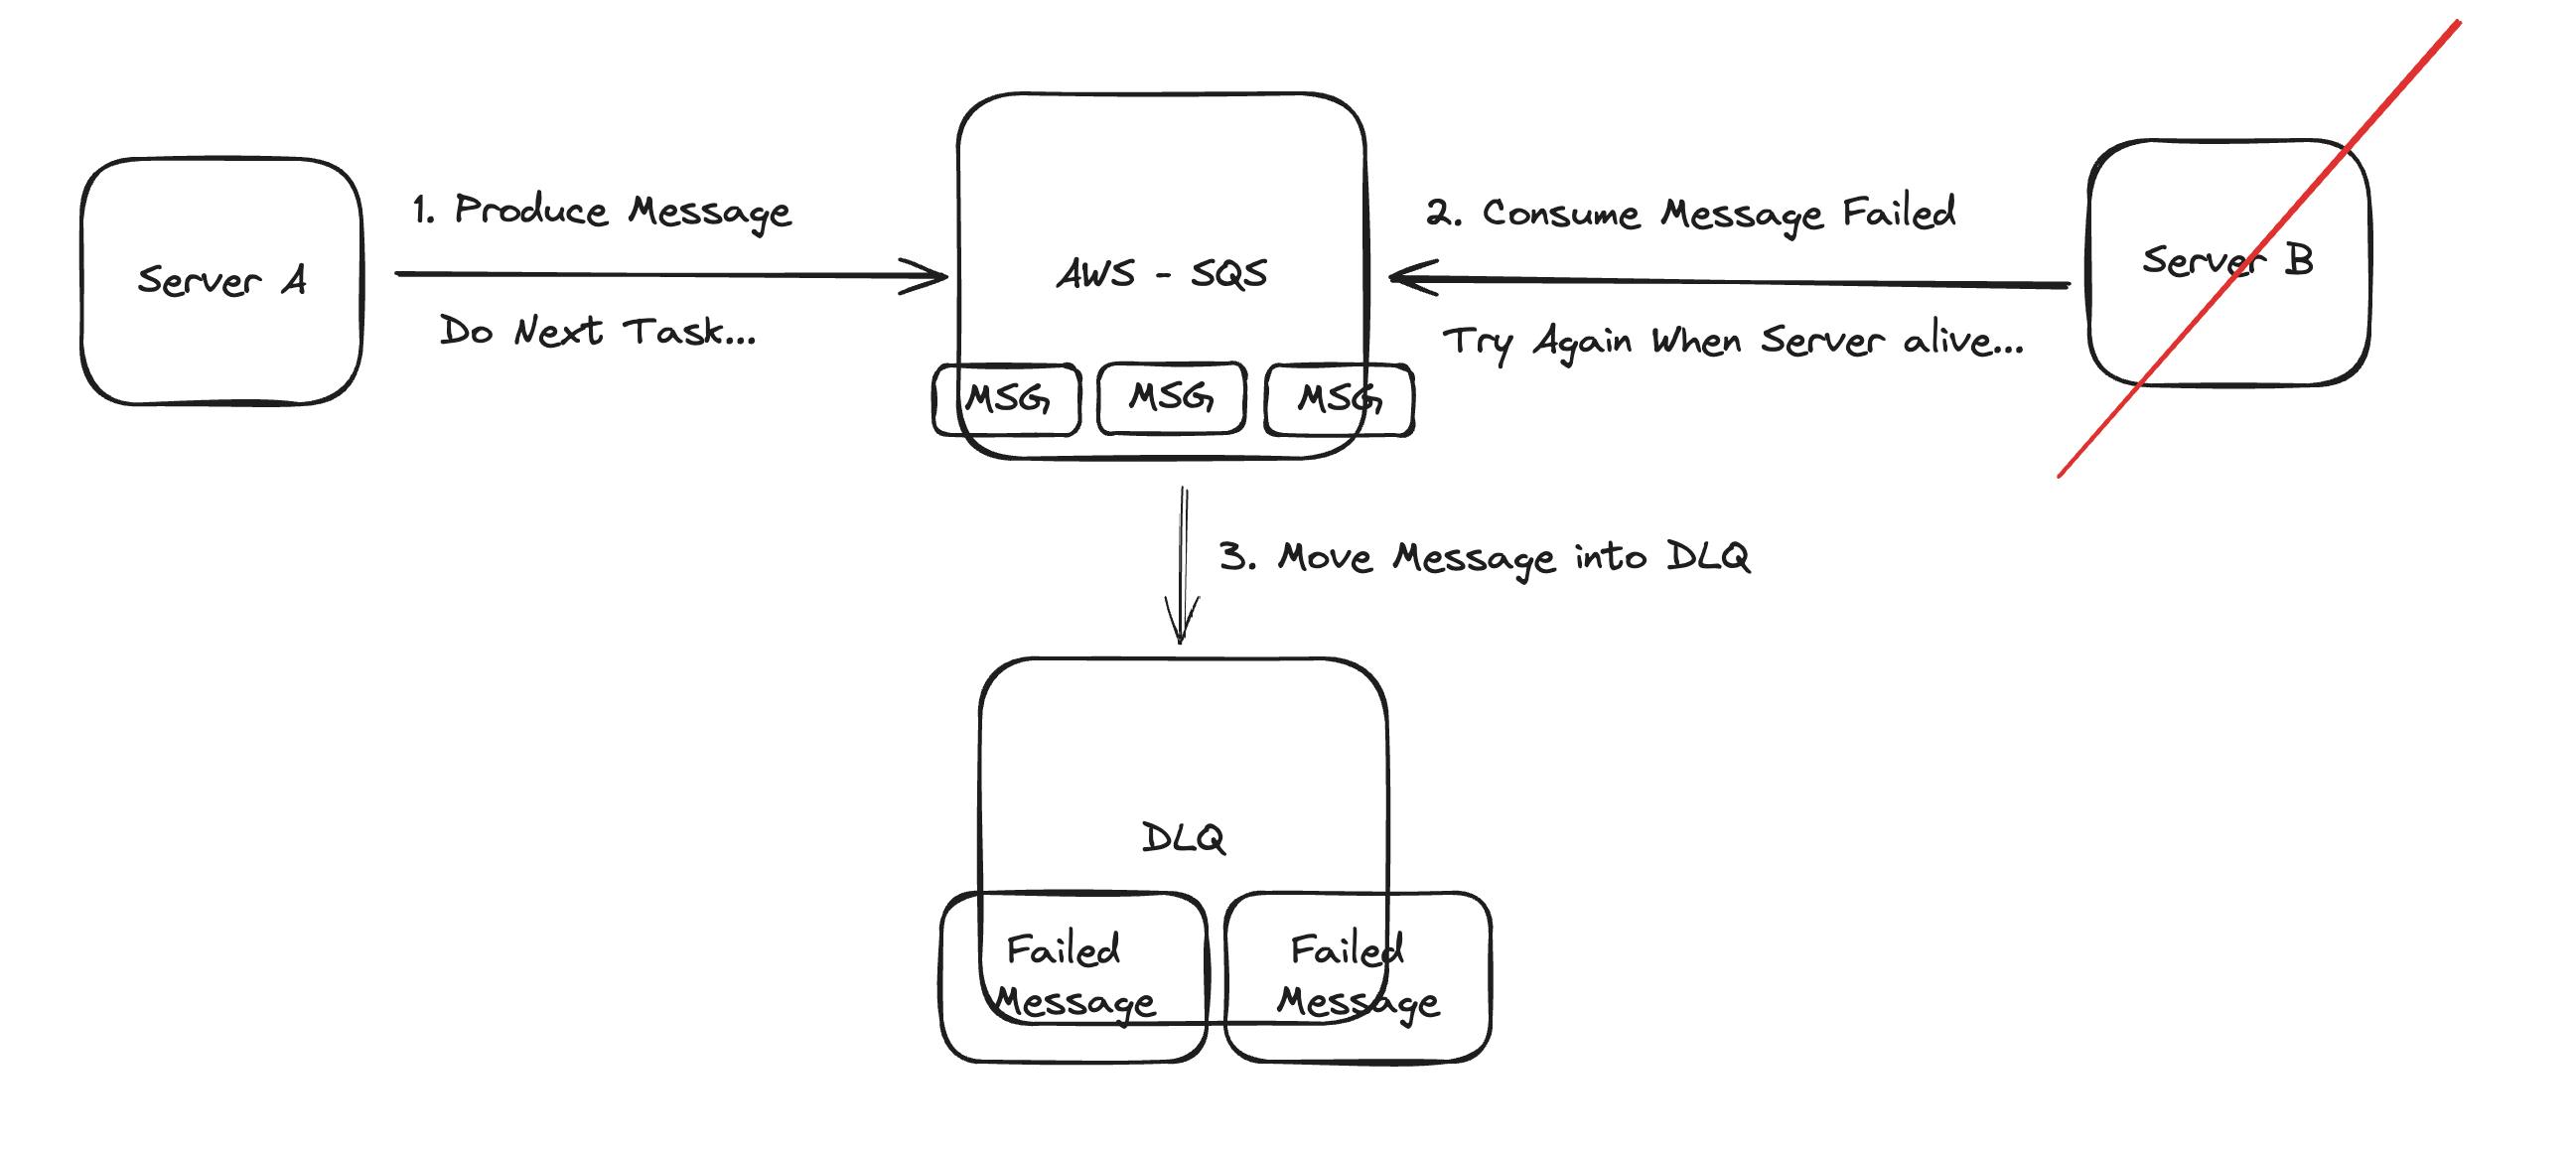
No SQS VS SQS
Micro Server 간 직접통신 시
- 아래처럼 Message 전송 후 수신이 실패하였을 때, 메세지를 버리거나 또는 Server B가 다시 살아나길 하염없이 기다려야한다.

Mircro Server에 AWS SQS를 적용하면 ?
Server A가 생성한 메세지는 AWS SQS에 저장
Server B가 소비를 하던말던, Server A는 다음 테스크를 수행한다.
Server B는 서버가 깨어나면 다시 테스크를 수행한다.
메세지 수신 후, Message Delete 요청을 하지않으면 이는 정상 처리되지 않은 메세지로 DLQ (Dead Letter Queue)로 전송되어 보존되게 된다. 때문에 메세지는 유실되지 않는다.

Message Life-Cycle of SQS
Producer가 Message 를 SQS로 보낸다.
SQS는 서버 전체에 중복적으로 배포 (유실방지).
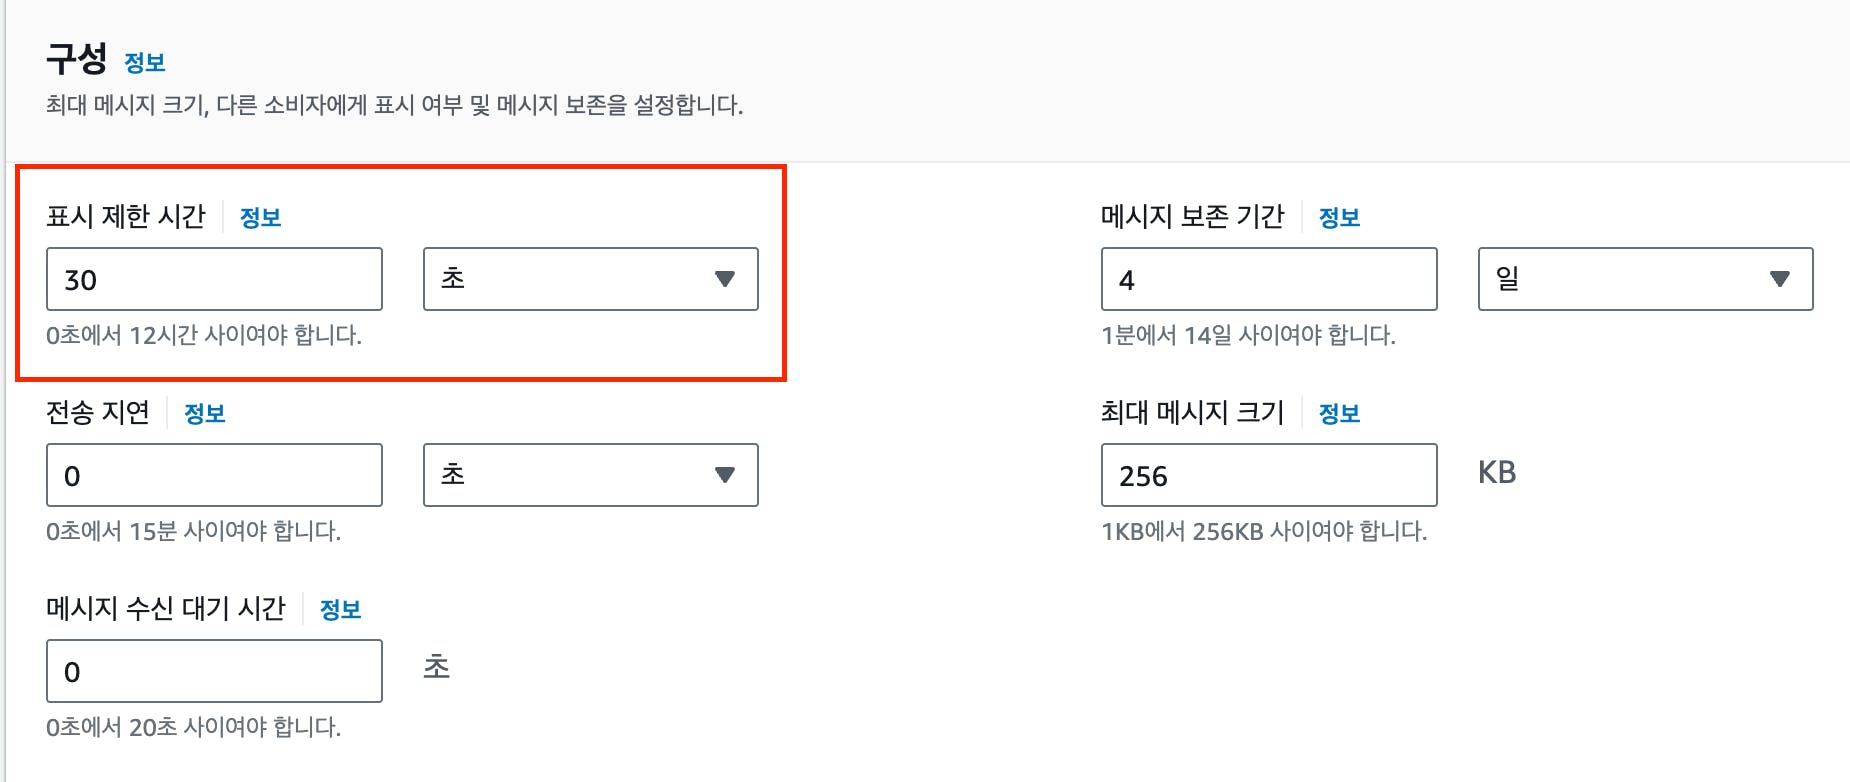
Consumer가 Message처리 시도하면, SQS는 Message를 표시제한시간 (Visibility Timeout) 동안 타 서버 요청에 전달하지 않도록 처리함.
SQS는 Consumer에게 Message를 전달.
Consumer Server는 메세지에 대한 프로세스를 처리하고, SQS에 메세지 삭제(완료)처리 요청.
만약, Consumer Server로부터 삭제(완료)요청이 SQS에 정상 수신되지 않는다면, Visibilitiy Timeout 시간 이후 메세지는 다시 노출.
*Visibility Timeout은 기본적으로 30초로 설정되며, 0초 ~ 12시간 사이에 설정이 가능하다.
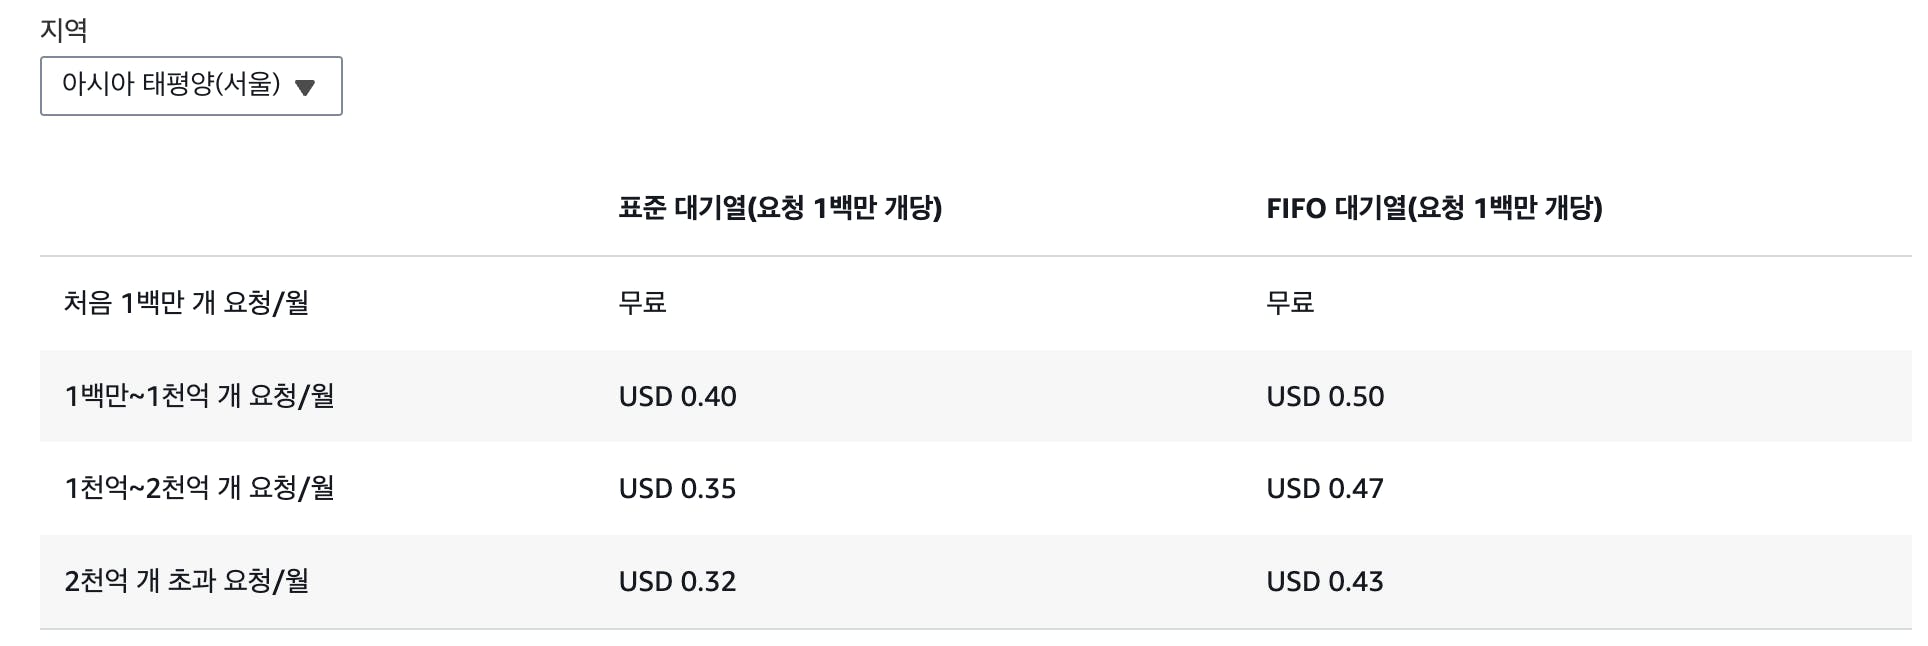
사용비용은 ?
📌 구현
- AWS Setting for SQS (*설정이 매우 간단하므로 플로우만 기록)
Setting IAM
SQS Full Access권한 부여Access Key & Secret Key 저장
AWS에서 Simple Queue Service로 이동 후
대기열 생성

- Setting in Nestjs
- Nestjs Project Setup
*필자는 Producer Consumer를 분리하려 했으나, 귀찮아서 producer에서 모두 진행하게됨.
nest new aws_sqs # Nestjs에서 aws_sqs라는 이름의 프로젝트 생성
nest g mo producer # Nestjs에서 producer라는 모듈 생성
nest g co producer # Controller단 생성
nest g s producer # Service단 생성

# 기타 AWS SQS사용을 위한 Dependency Install
npm install @aws-sdk/client-sqs uuid
- Module에 SQS Client를 Setting해준다.
import { Module } from '@nestjs/common';
import { ProducerService } from './producer.service';
import { ProducerController } from './producer.controller';
import { SQSClient } from '@aws-sdk/client-sqs';

@Module({
    imports: [
        // import SQS Client
        SQSClient
    ],
    providers: [
        {
            provide : SQSClient,
            useValue : new SQSClient({
                region: '{SQS Region}',
                credentials: {
                    accessKeyId: '{your access key of IAM}',
                    secretAccessKey: '{your secret access key of IAM}'
                }
            })
        },
        ProducerService
    ],
    controllers: [ProducerController]
})
export class ProducerModule {}
Consumer API 생성
Service
  import { DeleteMessageCommand, ReceiveMessageCommand, SQSClient, SendMessageCommand } from '@aws-sdk/client-sqs';
  import { Injectable } from '@nestjs/common';
  import { v4 } from 'uuid';

  @Injectable()
  export class ProducerService {
      private readonly QUEUE_URL='<https://sqs.us-east-1.amazonaws.com/665593300044/my-fifo-queue.fifo>';

      constructor(
          private readonly sqsClient : SQSClient
      ){}

      async produceMessage(data : any) {
          const command = new SendMessageCommand({
              QueueUrl : this.QUEUE_URL,
              MessageBody : JSON.stringify(data), // Data into Queue
              MessageGroupId: 'message-request', // Message Group ID
              MessageDeduplicationId: v4() // 유니크한 ID를 입력하여, 중복을 방지함. (같을 시, 첫번째 이후 요청은 저장하지 아니함)
          })
          try {
              return await this.sqsClient.send(command);
          } catch(e) {
              console.log(e);
          }
      }

          ...
  }
Controller
  import { Body, Controller, Get, Post } from '@nestjs/common';
  import { ProducerService } from './producer.service';

  @Controller('producer')
  export class ProducerController {
      constructor(
          private readonly producerService : ProducerService
      ){}

      // 어떠한 형태의 Body든 받아서 Message를 생성하는 API
      @Post('/sqs')
      async produceMessage(@Body() body) {
          return await this.producerService.produceMessage(body)
      }

      ...
  }
메세지 생성 API 요청
- 아래와 같이 요청하면, SQS에 메세지를 생성한다.

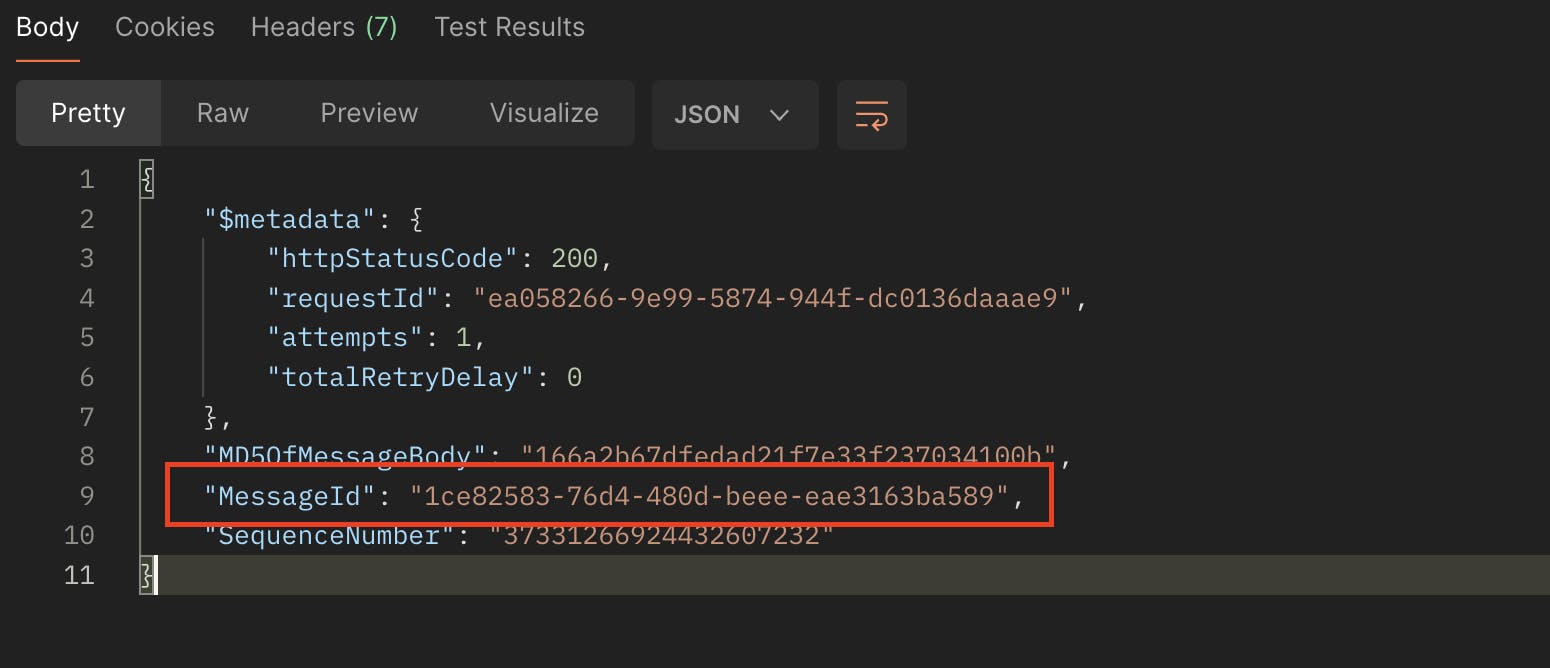
결과로
Message Id와 함께 받을 수 있다.
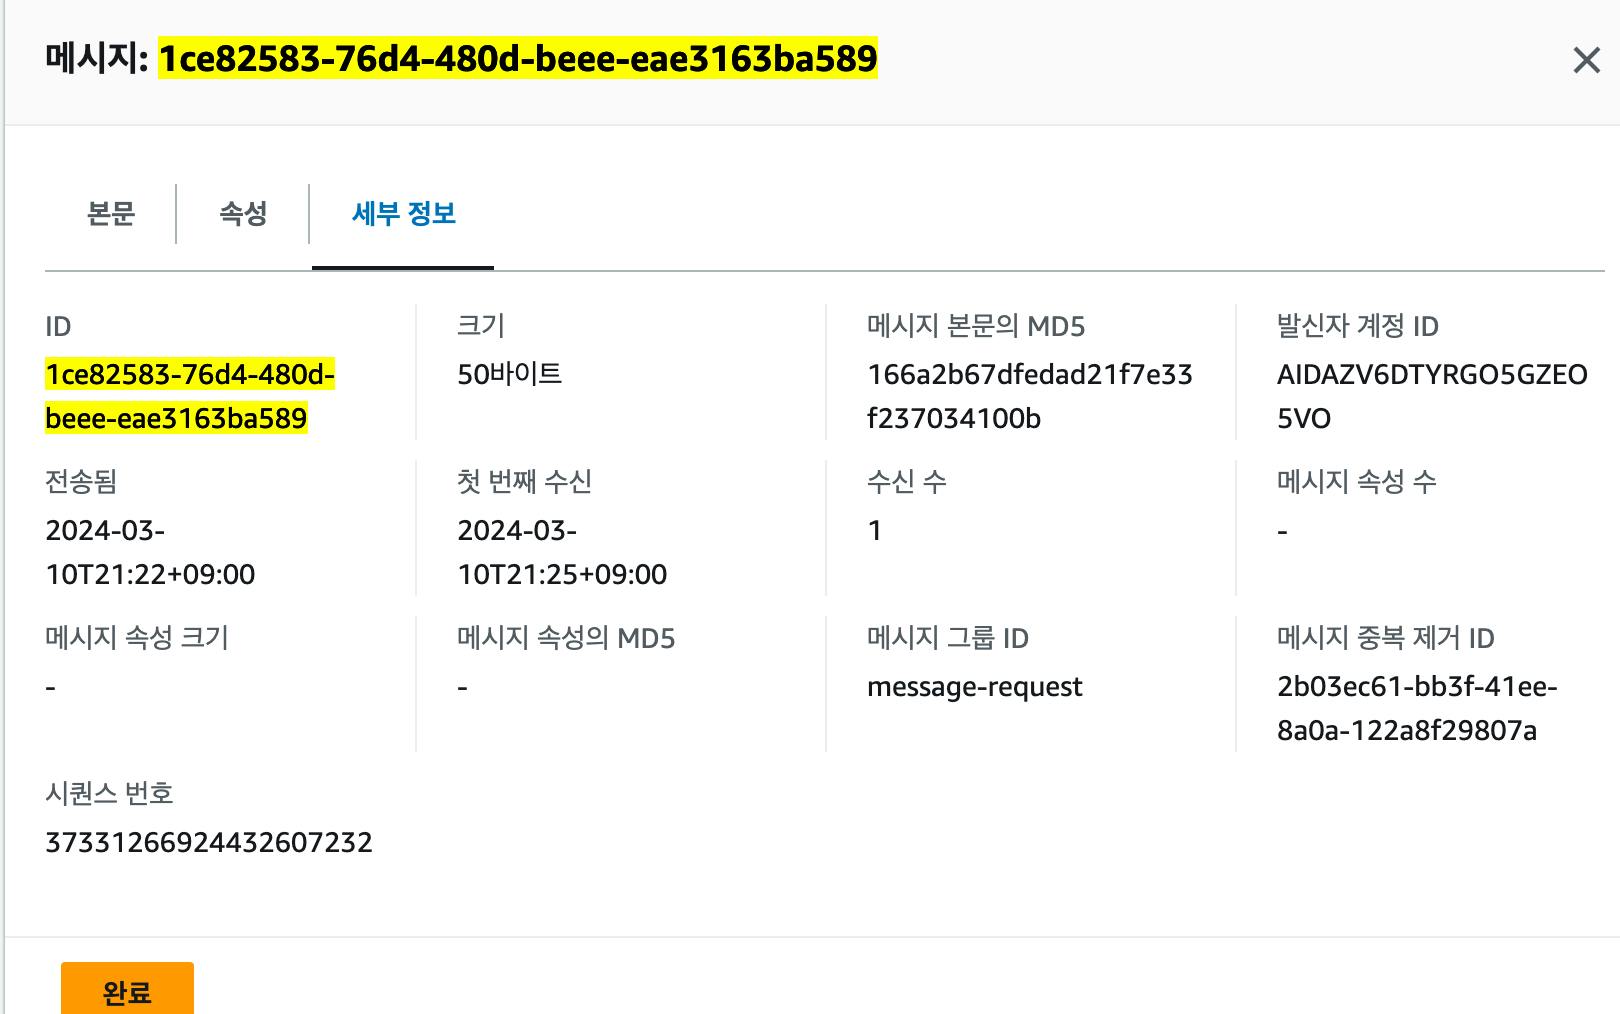
실제로 잘 들어갔는지 확인해보자.
생성한 SQS에 들어가
메세지 전송 및 수신에 들어간다.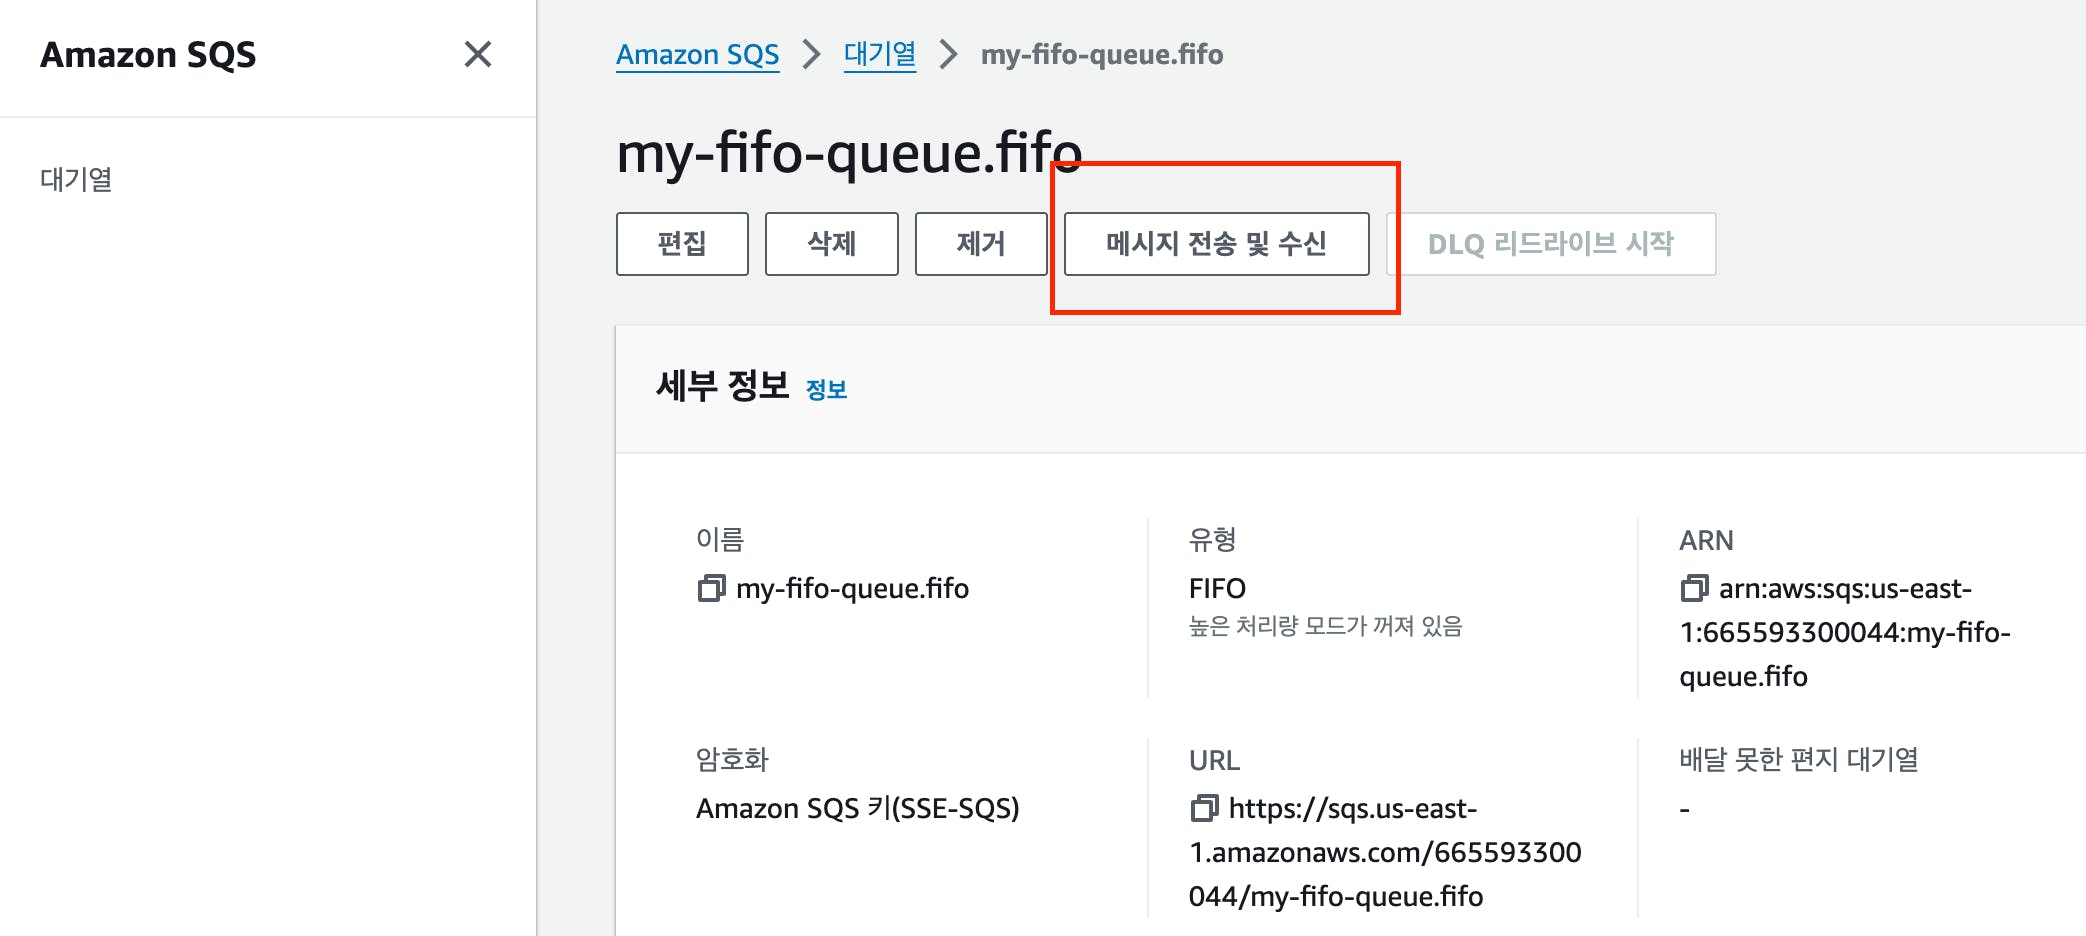
아래 메세지 수신 부분에서
메세지 폴링버튼을 눌러 아래 방금 생성한 메세지가 정상 생성되는지 확인.아래 확인할 메세지를 눌러, 세부정보 탭에서 방금 생성한 Message-ID의 메세지가 생성됨을 확인할 수 있다. (본문탭에서는 생성한 메세지의 Body값 또한 확인이 가능하다.)

이제 메세지를 소비할 ConsumeMessage API를 생성한다.
Service
  import { DeleteMessageCommand, ReceiveMessageCommand, SQSClient, SendMessageCommand } from '@aws-sdk/client-sqs';
  import { Injectable } from '@nestjs/common';
  import { v4 } from 'uuid';

  @Injectable()
  export class ProducerService {
      private readonly QUEUE_URL='<https://sqs.us-east-1.amazonaws.com/665593300044/my-fifo-queue.fifo>';

      constructor(
          private readonly sqsClient : SQSClient
      ){}

      ...

      async consumeMessage() {
          try {
              // Msg 수신 - 이 때부터 Visibility Timeout 걸림.
              const receiveCommand = new ReceiveMessageCommand({
                  QueueUrl : this.QUEUE_URL,
                  MaxNumberOfMessages: 3, // 최대 3개까지 메세지를 읽어들임
                  VisibilityTimeout: 10, // 읽어오고 타 서버에서 읽지 못하게 하는 시간 (10초)
              })
              const receiveResp = await this.sqsClient.send(receiveCommand);

              // Msg 완료처리 (Remove Message)
              const removeCommand = new DeleteMessageCommand({
                  QueueUrl : this.QUEUE_URL,
                  ReceiptHandle :receiveResp.Messages[0].ReceiptHandle // 0번째 한개만
              })
              const removeResp = await this.sqsClient.send(removeCommand);

              // Message 실패처리 (Visibilitiy TimeOut 변경)
              new ChangeMessageVisibilityCommand({
                  QueueUrl : this.QUEUE_URL,
                  VisibilityTimeout: 0, // 0으로 변경함으로써 다른 서버에서 읽을 수 있음.
                  ReceiptHandle: receiveResp.Messages[1].ReceiptHandle
              })

              return {
                  received : receiveResp,
                  removed : removeResp
              };
          } catch(e) {
              console.log(e);
          }
      }
  }
Controller
  import { Body, Controller, Get, Post } from '@nestjs/common';
  import { ProducerService } from './producer.service';

  @Controller('producer')
  export class ProducerController {
      constructor(
          private readonly producerService : ProducerService
      ){}

          ...

      @Get('/sqs')
      async consumeMessage() {
          return await this.producerService.consumeMessage();
      }
  }
메세지를 한개만 생성했으니 그대로 바로 Get 요청보내서 메세지를 없앨 수 있다.
- Consume Message API 요청 후 결과값은 아래와같다.
    {
            // 메세지 Consume을 하기위해 메세지를 읽은 데이터
        "received": {
            "$metadata": {
                "httpStatusCode": 200,
                "requestId": "17cd1b5c-2601-5fcf-83d3-453b8c288b67",
                "attempts": 1,
                "totalRetryDelay": 0
            },
            "Messages": [
                {
                    "Body": "{\\"title\\":\\"Message 1\\",\\"description\\":\\"this is test\\"}",
                    "MD5OfBody": "166a2b67dfedad21f7e33f237034100b",
                    "MessageId": "1ce82583-76d4-480d-beee-eae3163ba589",
                    "ReceiptHandle": "AQEBO8fq6FolRrymV57gcTk9ObyK7uyWERyD8kMBB/krdPG251vI0qMXXBvB7WgKhfWz4l/15WB5kGF/4/wSgVDSuA5ZknWCXUxpXjwIao8x9lEUGncMF+Lib2RqxI7ur9krbWBhjY1VW2HrFk1UZITGEKMxsfpzcFoS5vvs2Ty/my6ZwVtOwXb88njWcYTMGEqZDo4CkgYIbY54ME+yMWMhtoUiehS1n5aABiJacU0CNff8/u7F0Cb9E9JDzlabqLruObOwNVVKpVnvTY0pHyQoYSp6T7ph02bHY8E6w5b2yhs="
                }
            ]
        },
        "removed": {
            // 메세지 완료처리를 위해 Remove 결과 값
            "$metadata": {
                "httpStatusCode": 200,
                "requestId": "6d1b38c0-3d4a-5c7e-90f1-66a7976018d6",
                "attempts": 1,
                "totalRetryDelay": 0
            }
        }
    }
📝 결론 및 요약
AWS SQS는 복제본 저장 방식 + DLQ 운용을 통해 Message 유실방지 및 안정성을 유지한다.
AWS SQS는 매우 단순하게 Message Queue 서비스를 제공 한다.
AWS SQS 비용은 매우 저렴하며, 백만 이하 요청에 대해서는 월간 무료로 사용할 수 있다.